Cream Cheese Mints

This classic and timeless Cream Cheese Mint is the perfect melt-in-your-mouth candy to make for your next party. They are creamy and sweet with a hint of mint flavor that is so refreshing, you’ll want to eat them again and again!
I am a huge fan of making candy at home. Especially easy recipes where you don’t need a candy thermometer (like this Reese’s fudge). I just love sharing sweets with friends and family! If you love making candy, you’ve got to try this hard-to-resist Irish potato candy and this scrumptious peanut butter pinwheel candy!

Cream Cheese Mints Recipe
This cream cheese mint recipe is a classic for a reason. They are so smooth and creamy on the inside, and have the perfect amount of mint flavor to refresh you. They are so fun to make too! I had a lot of fun making these mints with my kids, and they are really hard to get wrong. You can color them in so many different ways. I like to separate the cream cheese batter into different bowls so that I can make 3 or 4 colors.
If you have never tried a cream cheese mint you are in for a treat! My grandma used to make them, and they have always been a favorite of mine, along with peanut butter pinwheel candy and toffee. They are easier to make than caramels, and people love them just as much! I have made these mints for weddings, Christmas, baby showers, Easter, graduation parties, the list goes on. They are perfect for any and all occasions!
Ingredients
You only need a few simple ingredients to make these delicious cream cheese mints. They are so simple to make, and you will have them whipped up in minutes! They are a classic candy that you will really enjoy making with friends and family. You can find exact measurements below in the recipe card.
- Cream Cheese: This is a key ingredient. It gives structure to the mint, along with a tangy sweet flavor that you can’t leave out!
- Salted Butter: I like to use salted butter because this recipe is really sweet. You could use unsalted butter and add salt back in if you prefer.
- Powdered Sugar: Confectioners sugar helps to balance out the tangy flavors in the cream cheese. It makes the mint taste a little like frosting, it’s so yummy!
- Peppermint Extract: This is what gives the mint it’s minty flavor. You really have to include this ingredient!
- Vanilla Extract: Vanilla extract helps to bring out all of the delicious flavors in this mint. It also adds a little vanilla flavor that helps to balance out the sugar flavor.
- Almond Extract: Almond extract is a strong flavor that is almost fruity. If you like marzipan, you’ll love almond extract in these mints. You could also leave it out if you aren’t a fan of almond.
- Gel Food Coloring: This is what gives the mints their colors. If you are hosting a baby shower, you could choose pink and blue. Just use whatever colors fit the day, or whatever your favorite colors are! You could also leave them out altogether if you just wanted plain white mints. You can add a liquid food coloring if that’s all you have on hand, just be careful to not add to much extra moisture to the batter.
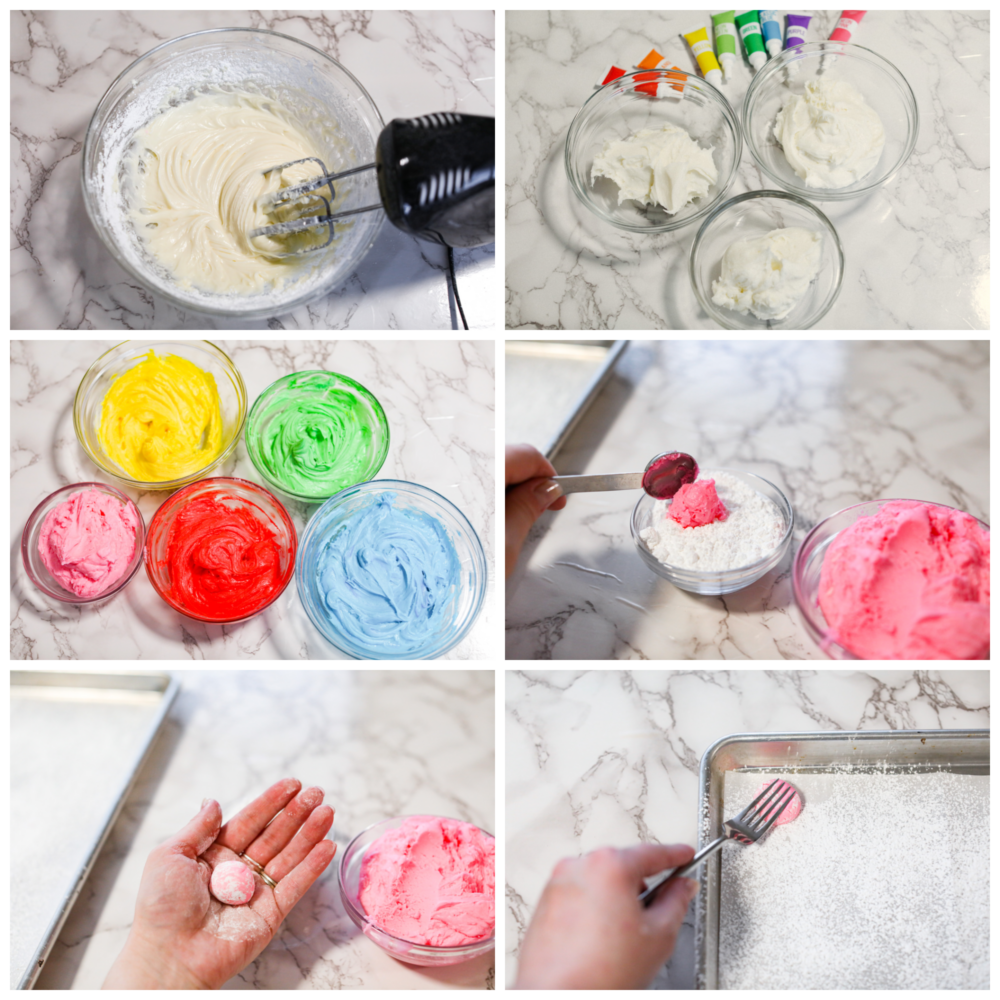
How to Make Cream Cheese Mints
These cream cheese mints are perfect for any occasion! They are a classic treat that everyone gets excited about. I can’t help but smile when I see how happy these candies make people, because they are so easy to make!
Make the Cream Cheese Mints
- Beat: In a large bowl with a hand mixer, or a stand mixer fitted with a paddle, beat your cream cheese and butter together until creamy and well combined.
- Mix: Reduce mixing speed to low, and gradually add 3 cups of your powdered sugar in, ¼ cup at a time. Once the 4 cups of powdered sugar has been incorporated, add your mint and vanilla extracts, mix until combined.
- Add Sugar: Gradually add in the remaining 2 cups of powdered sugar until your dough is completely smooth and well mixed.
Color and Shape
- Divide and Color: Divide your mixture into bowls, for as many colors as you are going to use. Add a small amount of food coloring to each bowl and stir together until your desired color has been reached and all the food coloring has been mixed in.
- Cool: Cover and refrigerate the mixtures for about an hour, you want it to firm up a bit so it is easier to handle. While the candy is cooling, line a baking sheet with parchment paper or wax paper and dust with powdered sugar.
- Shape: Once the candy has cooled for an hour you can begin to form your individual mints. Pinch off or scoop out about a teaspoon of candy mixture, toss in a bowl of powdered sugar to coat and roll between your hands to form a ball. Place balls on the parchment lined cookie sheet and using the tines of a fork to slightly flatten them and leave an indent in the top. Repeat until all the candy has been used.
- Harden: Allow the mints to harden at room temperature for at least 3 hours before enjoying. They can be stored in an airtight container at room temperature for up to 2 weeks.

Tips for Making Cream Cheese Mints
These mints are so simple to make! Once you make them for yourself, you will pick up your own little tips and tricks to make the recipe your own. Here are a few tips from my years of experience!
- Prevent Sticking: Be sure to roll the balls of candy into powdered sugar before pressing them into molds. This prevents them from sticking as you shape them.
- Decorating Tips: These mints are decorated by using the technique I mentioned in this recipe with the tines of a fork, but you can press them any way you’d like. You can gently press them with the bottom of a cup for a smooth finish, but you can use any tool to create many different designs! These mints also work great being pressed into candy molds for more detailed designs.
- Best Fresh: These are best enjoyed fresh but they can be kept in the fridge and freezer to store for longer periods of time.
- Customize: The beauty of these mints is how easily customizable they are. You can color them for any occasion. Decorate the top to fit any theme. They are a great treat to bring to any gathering!

Storing Leftovers
These mints are definitely best when fresh, but you can store them or make them ahead of time if you need to. Here are my tips for storing your cream cheese mints.
In the Refrigerator: They will stay fresh in the refrigerator when stored in an airtight container for up to two weeks! You can also freeze this recipe, so if you make a large batch for a big party they can be frozen in a Ziploc bag for up to three months.

Cream Cheese Mints
Ingredients
- 8 ounces cream cheese room temperature
- 1 tablespoons salted butter room temperature
- 5 cups powdered sugar
- 2 teaspoons mint extract
- ½ teaspoon vanilla extract
- ½ teaspoon almond extract
- gel food coloring of your choice
- additional powdered sugar for rolling mints in
Instructions
-
In a large bowl with a hand mixer, or a stand mixer fitted with a paddle, beat your cream cheese and butter together until creamy and well combined.
-
Reduce mixing speed to low, gradually add 3 cups of your powdered sugar in, ¼ cup at a time. Once the 4 cups of powdered sugar has been incorporated, add your mint and vanilla extracts, mix until combined.
-
Gradually add in the remaining 2 cups of powdered sugar until your mixture is completely smooth and well mixed.
-
Divide your mixture into bowls, for as many colors as you are going to use. Add a small amount of food coloring to each bowl and stir together until your desired color has been reached and all the food coloring has been mixed in.
-
Cover and refrigerate the mixtures for about an hour, you want it to firm up a bit so it is easier to handle. While the candy is cooling, line a baking sheet with parchment and dust with powdered sugar.
-
Once the candy has cooled for an hour you can begin to form your individual mints. Pinch off or scoop out about a teaspoon of candy mixture, toss in a bowl of powdered sugar to coat and roll between your hands to form a ball. Place balls on the parchment lined pans and using the tines of a fork to slightly flatten them and leave an indent in the top. Repeat until all the candy has been used.
-
Allow the mints to harden at room temperature for at least 3 hours before enjoying. They can be stored in an airtight container at room temperature for up to 2 weeks.
Nutrition
from The Recipe Critic https://ift.tt/HQe8z05
via gqrds



Comments
Post a Comment